 The sun was shining today – a near miracle in Washington state during the month of January – so I decided we should take advantage of the good weather.
…by baking bread and taking pictures.
Yes, that’s actually what I thought. Not, go to the park, take a walk or get some fresh air.
Nope, it was more like, “Hey kids, the sun is out which means we could take some good pictures inside (without the flash, of course) for the blog. Let’s make bread!”
Apprentice baker and photogenic blog hog.
Some people are sort of pathetic.
I am one of those people.
But I do have a delicious bread recipe to share.
Years ago (for an exact date I’ll have to ask my mom or one of her sisters) my beloved Nana wanted to create a recipe for bread that would be delicious, simple, require few ingredients, and be low in fat. She devised this recipe, named it Mesa Manna (after her home which was nicknamed, The Mesa) and shared it with the family.
I have made all sorts of different bread recipes over the years, but I continually come back to Mesa Manna. It is just what Nana desired: simple to prepare, delicious and low in fat.
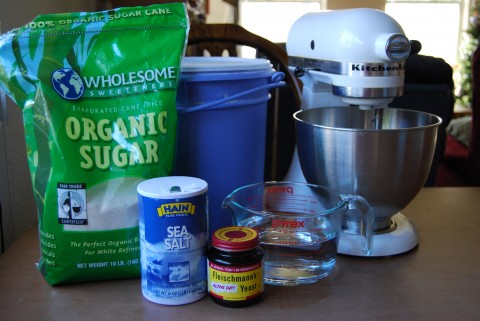
I use my Kitchen Aid but this could also be made by hand. If you are a baker extraordinaire, please excuse my long (rather redundant) explanations. Also, I’m afraid I NEVER measure anything but the water for this recipe so you might have to experiment a little bit here and there on the exact amount of the ingredients. Thankfully this recipe is incredibly forgiving.
Mesa Manna
Ingredients
3 c. warm water
1 tbs yeast
1 tbs sugar
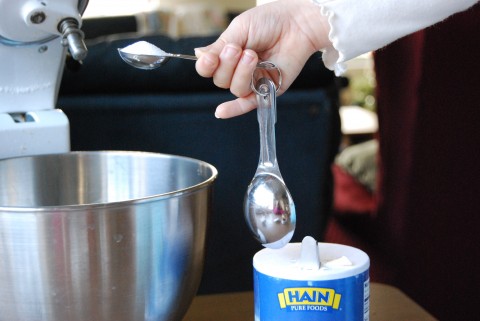
1 tbs salt
1/3 to 1/2 c. sugar
7 cups of flour
Directions
3 cups warmish/hot water (not burning hot or it kills the yeast)
1 tbs yeast
1 tbs sugar
Let sit 5 minutes. Stir. If the mixture is foamy, your yeast is active. Cheer and be thankful that in several hours your home will be filled with the irresistible smell of fresh bread.
Add 1 tbs salt
1/3 to ½ cup of sugar (honey or brown sugar)
Begin to add flour. I usually stir in 3 or 4 of cups first. After a little bit I can tell my Kitchen Aid is itching to do it’s thing so I attach the dough hook, toss in another cup or two of flour and turn it on.
Sarah scrapes the edge of the bowl. Such a big helper!
The dough probably needs one or two cups of additional flour. I let the Kitchen Aid knead a little while (there’s time to check my e-mail or put in a load of laundry but not much more). When dough forms a nice ball in the Kitchen Aid, it’s done.
If I were making Mesa Manna by hand (which Tim and I have done many times over the years), I would stir the flour into a large bowl until it was coming together nicely (no longer terribly wet like cake batter). Then I would put it out on a clean counter top that is floured. The dough will be sticky so you need to have additional flour on hand. Knead it, adding flour as necessary, until the dough shines and has an elastic feel to it.
Put oil (I don’t measure–probably a tablespoon or two) in bowl and add dough, turn dough so it’s all “greasedâ€. Cover bowl (I use a clean dishtowel–you could use plastic wrap or foil) and set aside.
I usually let the dough rise in either the microwave (that has run for 30 seconds) or a warm oven. This is a tip an older woman from our previous church shared with me, and it works beautifully (especially when the temp varies in your house). Turning the oven off is KEY! Do not neglect this step. I use a metal bowl if I’m putting it in the oven or a plastic bowl for the microwave, but I’m boring that way.
It has nothing to do with a melted Tupperware bowl – baked plastic and bread dough, yum! Nope, not at all.
Let rise 1 hour or so. I don’t really pay too much attention to the time–it might need more. Check it and see how it’s rising. This dough is very forgiving so if you have less time or more time just go with it. If you won’t be cooking the bread for some time, you can easily punch it down and let it rise again.
Bread bowl experiments.
Make into rolls on greased cookie sheet. I usually cut the tops of the rolls (with my kitchen scissors) to make them look pretty and my mom puts a dash of water on the top of each one. Let them rise (if you have time) another 20 or 30 minutes. If you don’t have time (and they look fluffy enough already) you can put them in right away. You can also cook them in a ‘cold oven.’ They rise as the temperature in the oven increases.
400 degrees for (approx) 20 minutes.
This will make 3 large pizzas or a very full pan of rolls. I’ve also used the recipe to make sweet rolls. Tim likes egg Stromboli for breakfast (basically just scrambled eggs wrapped inside the dough and then baked). The kids really love them made with all white flour (I must admit, they are VERY yummy that way). These days I immediately mix the whole wheat and white flours together in my bin so all white bread is not an option. I sometimes add additional ingredients – powdered milk, plain yogurt, oatmeal, different types of flour, or even spices (Italian Seasonings if I’m going savory or Cinnamon if we’re feeling sweet). Experiment and have fun with this very versatile recipe.
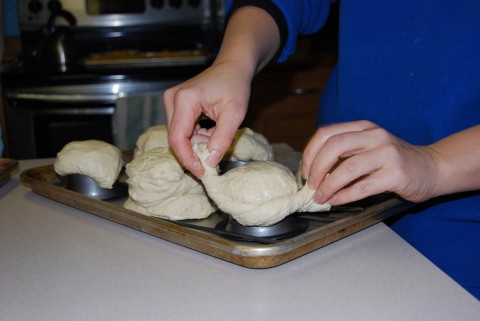
Making bread bowls for soup.
Yesterday I made a delicious pork stew and thought it would be fun to bake our own bread bowls. We tried them again today, this time cooking some over top of upside down popover tins and others on top of over turned bowls. The bowls work much better because the flatter bottom. We put on a light egg wash before baking.
We also discovered greasing the bowls is a crucial step and shouldn’t be missed. If you happen to run out of baking spray, don’t shrug and figure it will be okay, take the time to put oil or butter on the baking dishes.
Trust me on this one.
Who’s up for some soup, in a freshly baked bowl? If you have a favorite bread recipe, leave a comment and share it us.
Mom, Aunt Kate, Aunt Stephanie, Thom, or Joyce did I miss any crucial steps in describing Mesa Manna? This is how I make mine but I bet your version might be slightly different. Tell all!!
Stop by Works for Me Wednesday for other tips and treats.
Kathy
Project 366 – Day 15


Love the pictures and the recipe! Thanks for sharing. I need to make some bread bowls ASAP! Looks yummy!
Makes me hungry!! Thanks for sharing your secret family recipe with us! We always put a crushed garlic clove or 2 into our pizza dough recipe – which also would work for dinner rolls of course. Another twist on the savory angle.
Me too! Me too on the living in Washington and me too on the breadbaking and me too on the KitchenAid and me too on seeing sunlight and thinking of blog pics.
Cute post, terrific photos, and beautiful pic of Sarah at the top. It does sound versatile, if you’re “brave” enough to try it over upside-down bowls!
So, when can I come over? To eat, of course!
This looks great! Good job!
Looks yummy! What great pictures!
THANK YOU! For years I’ve been meaning to ask for the recipe, but thought perhaps it was a secret family recipe. Can hardly wait to try it.
To the uninitiated: I can personally attest to the yumminess of these as Kathy made them even way back in our apartment in college. It was a great assembly line system: 1. she would make them and 2. the rest of us would smell them and then consume them in vast quantities covered with butter.
Yummy! I love getting new bread recipes. I never thought about making bread bowl like that, it’s a great idea!
This idea is awesome! I’m going to have to try it
this looks so yummy. i’ll have to give this one a bookmark and a try! (it’s funny to know that other people also think about blogging their life…)
Been eating and making this wonderful bread for years. While on the swim team I would show up at Kathy’s parents house and down some rolls. Her brothers and I would empty the bread basket quickly. Thanks for bring back those memories. Bread bowls…..very creative.
I experimented for years with your nana’s Mesa Manna. Finally found the right combination of ingredients to make 2 marvelous loaves of healthy bread! I loved reading your blog and seeing the perfect photos of each step. Good job!
Here’s my adapted recipe: 2 1/4 t powdered yeast; 2 1/2 c water, 2 T sugar, 4 c ww flour; 2 1/2 – 3 c bread flour; 1 1/4 T salt; 8 t gluten; 3 T milled flax seed. The gluten seems to help the whole wheat rise better. The flax was added because I read it was healthy!
I also use a KitchenAid at first, but use my hands to knead the last part. After it’s doubled in size, I form into 2 loaves, put on greased pan, wet tops of loaves, let rise again, then start cooking in cold convection oven @ 425* for 30 min.
Years ago when your nana was alive, we all shared our methods of making Mesa Manna. Interesting that we all make it differently, but it’s all good!!!
I’m going to make some NOW!
Thanks for the quick response and for giving out your recipe! That was the first time I replied to a blog-could you tell? Sounds yummy! Uncle Steve loves bread. I think I’ll be making this recipe over and over. Thanks again. Keep on blogging!
I will give your recipe a try. I make bread all the time and am always looking for good recipes. If you are interested in mine, email me. I’d be happy to share. I’m been making my recipe for 25 years, it’s not mine so I can brag about how good it is. It’s called whole wheat honey bread.
Thanks for sharing!

I haven’t made bread in a long time, but your recipe and pictures may have inspired me to try. Those little bread cups – wouldn’t they be fantastic with a thick chicken stew?
great blog!! I don’t think you missed anything. Do you always add the salt AFTER the yeast has had it’s time to do it’s initial thing? I think, now that I look back, that Mom did it that way, too.
Do you always add the extra brown sugar or honey- or just for certain sweet recipes?
VERY INTERESTING. I love you, Aunt Kate
Mmmmm…looks delicious!
Looks wonderful Kathy! (Wish there was a gluten-free version!)
YUM. That looks DELICIOUS! And, I LOVE the snowflake background and the new photo at the top. It’s probably been there awhile, but this is the first time I’ve seen these changes since I haven’t had time to read longer blogs lately. It seems these days I only have time to read a few quick short ones so I have to save longer ones like yours for times when I know I have a bit more time to read and enjoy!
Those look delicious-bread bowls, never would have guessed it, wow thanks-I’m going to try these, yum!
ohhhhhhh very kewl! Thanks for the recipe!